Any homebrewer will tell you: brewing the beer is the fun part. Bottling the beer? That’s the tedious, sticky part. Waiting two weeks for the bottles to condition only makes the process more agonizing.
If you are tired of scrubbing bottles, boiling priming sugar, and waiting for natural carbonation, it is time to upgrade. A Keg Smiths Mini Keg system allows you to force carbonate your homebrew quickly and accurately, getting from fermenter to glass in a fraction of the time.
Here is your straightforward guide on how to force carbonate homebrew in a mini keg.
What Is Force Carbonation?
When you bottle-condition beer, you rely on residual yeast consuming extra sugar to slowly release CO2 within the sealed bottle. This takes weeks.
Force carbonation bypasses the yeast entirely. You inject pressurized CO2 directly into the cold beer. Because gas dissolves much faster into cold liquid under high pressure, you can achieve perfect carbonation in as little as 24 to 48 hours—or even less using the "shake" method.
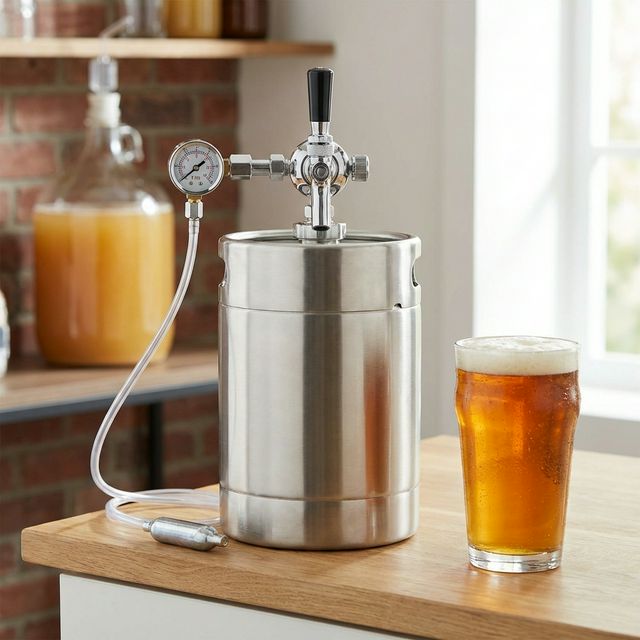
The Keg Smiths Setup
To force carbonate, you need three things:
- A pressure-rated vessel: Our 1-Gallon (128oz) or Mini (64oz) 304 stainless steel kegs.
- A CO2 source: 16g threaded CO2 cartridges.
- A regulator: The Keg Smiths adjustable dial regulator lets you dial in the exact PSI needed for the style of beer you are brewing.
The Process: Step-by-Step
Step 1: Crash Cool Your Fermenter
Cold liquid absorbs CO2 much faster than warm liquid. Before transferring your beer to the mini keg, place your fermenter in the fridge for 24-48 hours (a process known as "cold crashing"). This also helps clear the beer by dropping yeast and proteins out of suspension.
Step 2: Sanitize EVERYTHING
Cleanliness is the golden rule of homebrewing. Disassemble your Keg Smiths spear and faucet and sanitize the entire keg structure using a no-rinse sanitizer like Star San.
Step 3: Purge and Fill
Transfer the cold beer from your fermenter into the mini keg using a sanitized siphon. Leave at least 1-2 inches of headspace at the top of the keg so the gas has room to enter.
Pro-tip: Before siphoning, you can shoot a tiny burst of CO2 into the empty keg to purge the oxygen. CO2 is heavier than air, so it forms a protective blanket at the bottom, helping to prevent oxidation while filling.
Step 4: Seal, Purge, and Pressurize
Screw the tap unit onto the keg securely. Attach a fresh CO2 cartridge to the regulator. Before fully carbonating, turn the regulator dial to about 5 PSI, then pull the pressure relief valve ring for two seconds. This flushes any remaining oxygen out of the headspace.
Now, turn your regulator dial up. For standard ales and lagers, you’ll typically want the pressure set between 12 to 15 PSI.
Step 5: The "Set and Forget" Method vs. The "Shake" Method
The Set and Forget Method (Patient): Leave the regulator on at 12-15 PSI and place the keg back in the fridge. In about 2 to 3 days, the beer will absorb the CO2 and reach perfectly balanced carbonation.
The Shake Method (Fast): Want your beer faster? Turn the regulator up to 20 PSI. Disconnect the liquid faucet to prevent accidental spills. Turn the keg horizontally and gently rock it back and forth on your lap or a towel for about 3 to 5 minutes. You will hear the gas hissing as it is rapidly absorbed into the sloshing liquid. After shaking, put it back in the fridge to settle for 2-3 hours. Once settled, turn the pressure down to serving pressure (around 3-5 PSI), purge the excess headspace gas, and pour!

Perfect Pours Every Time
The biggest advantage of a mini keg over bottling is consistency. Dialing in the exact carbonation level using the Keg Smiths regulator means no more flat bottles and no more explosive "bottle bombs" from over-priming.
Skip the sticky bottles on your next brew day.
Upgrade to a Keg Smiths Mini Draft System today and enjoy your homebrew the way it was meant to be served—on tap.


Leave a comment
This site is protected by hCaptcha and the hCaptcha Privacy Policy and Terms of Service apply.